Upgrading Legacy Versions of Ubuntu

The standard Ubuntu versions go EOL quite quickly and it’s easy to miss the upgrade window such that running do-release-upgrade yields:

An upgrade from 'groovy' to 'impish' is not supported with this tool.

In this example, Ubuntu is looking to upgrade from 20.10 to 21.10 skipping 21.04 which is not supported. You’ve probably also reached a situation where you cannot even upgrade your current packages as the repositories have also been EOL’d and do not exist.

To upgrade step-wise, we need to upgrade our current platform first. You need to be logged in as root or using sudo for all of the following.

Start by changing your mirror in /etc/apt/sources.list to use old-releases.ubuntu.com. For example, in my case my mirror was ie.archive.ubuntu.com and so I can replace that via:

sed -i -e 's/ie.archive.ubuntu.com/old-releases.ubuntu.com/g' /etc/apt/sources.list

Once that’s done, upgrade your current system as usual:

apt-get update
apt-get dist-upgrade
shutdown -r now

Now that your current system is up-to-date, we need to do a distribution upgrade to 21.04 hirsute (in my case). do-release-upgrade will still not work so we need to manually download the upgrade tool and run that ourselves. Find the appropriate UpgradeTool file from Ubuntu’s meta-release page here. In my case the appropriate upgrade file was hirsute.tar.gz and I downloaded that via:

wget http://archive.ubuntu.com/ubuntu/dists/hirsute-updates/main/dist-upgrader-all/current/hirsute.tar.gz

You now need to extract and run the tool:

mkdir hirsute_files
cd hirsute_files
tar zxf ../hirsute.tar.gz
./hirsute

If you’re as fortunate as me, this will run cleanly just as it would have via do-release-upgrade. If you have no more intermediary versions, you can do the final upgrade via do-release-upgrade as normal. Remember also that upgrading from one LTS version to another is also supported by that tool.

Laravel 8 + Jetstream 2 + Livewire + Mix + NPM + Datatables

A post for Google’s crawler as this took me far too long to get working and the many many many Google hits on the topic all proved mostly unhelpful.

On a simple Laravel + Jetstream (Livewire version) installation, I needed DataTables to work. This also means jQuery needs to be installed.

What follows are the various changes to the default files to make this work:

package.json (versions as at Jan 2022, run npm install after updating file):

    "devDependencies": {
        ...
        "datatables.net-dt": "^1.11.3",
        "jquery": "^3.4.1",
        ...

webpack.mix.js – Alpine.js has an idiosyncrasy which causes issues for jQuery – it is loaded via <script src="" defer> – emphasis on the defer. This means that jQuery won’t be available for your scripts within the Blade templates and, specifically, $(document).ready() will throw an exception because the jQuery function, $, will not be defined as yet. To solve this, we create a second new js file by adding the following line:

mix.js( "resources/js/alpine.js", "public/js" )

resources/js/app.js – we need to remove the Alpine.js lines from here and place them in a new file, resources/js/alpine.js. Specifically – move the following lines:

import Alpine from 'alpinejs';
window.Alpine = Alpine;
Alpine.start();

resources/js/bootstrap.js – I added the following bolded lines:

window._ = require('lodash');

/**
 * We'll load jQuery and the Bootstrap jQuery plugin which provides
 * support for JavaScript based Bootstrap features such as modals 
 * and tabs. This code may be modified to fit the specific needs of
 * your application.
 */

window.$ = window.jQuery = require('jquery');


// Datatables
window.DataTable = require('datatables.net-dt');

...

Lastly, edit the template to not defer app.js and to load your new alpine.js file. In resources/views/layouts/app.blade.php, remove the script line for app.js and replace it with the following two lines:

<script src="{{ mix('js/app.js') }}"></script>
<script src="{{ mix('js/alpine.js') }}" defer></script>

I think the biggest confusion here was that there were no changes required to webpack.mix.js specifically for DataTables despite many online resources making changes there. Perhaps it was earlier versions of Mix? The second confusing issue was Alpine.js and the effects of ‘defer’ring app.js.

With the above, DataTables (and jQuery) are now available as usual in your Blade templates:

<script>
    $(document).ready(function () {
        $('#clients-table').DataTable();
    });
</script>

WireGuard – Linux Based VPN Server for iOS

Okay, I lied. WireGuard won’t just run on Linux for the server side but that is what it was originally designed for. Linux is the first class citizen as the WireGuard implementation there exists within the kernel.

I also lied about the clients – it’ll work on nearly any OS. We have been using OpenVPN with great success with many customers for years. We have our own management software and my macOS Viscosity client (highly recommended) has over 30 endpoints at this time. For various reasons, we use tap interfaces which just do not work for iOS.

I came across WireGuard a while ago and was intrigued by some of it’s design principles. Specifically:

  • UDP only (I remain, to this day, completely bewildered and baffled by any VPN running over TCP – yes, Mikrotik, I’m looking at your OpenVPN implementation);
  • how it presents as a simple network interface (and thus is configured via the normal iproute2 tools such as ip); and
  • its ssh-like public/private key exchange mechanism.

But I turned away as it stated that it was still a work in progress. It still states this but it looks pretty mature. Two gaps I have with OpenVPN right now seem to be filled by WireGuard: simple just works client for Apple iOS; and easy set-up mechanism for small deployments (e.g. I just want to get remote access to my home server without setting up a certificate authority or using static keys).

So, let’s look at setting up a server (Linux) / client (iOS) with WireGuard. As usual, I’m running the latest Ubuntu LTS on my server – in this case 18.04.

Important note about VPNs and dual-stack networks: many VPNs only work on IPv4. When using such VPNs on a foreign network with IPv6 support, you will only be protected for traffic that transit the IPv4 VPN. Any traffic that works over IPv6 will not go through your VPN – and today, this is a good chunk of traffic. The configuration below assumes your server is dual-stacked – which, today, it should be.

Note also in the examples below, I am using Google’s public DNS. You should install your own DNS resolver on your VPN server rather than using a third party one.

As WireGuard routes packets to and from its encrypted interface, you will need to ensure packet forward is enabled on your server:

sysctl net.ipv4.ip_forward=1
sysctl net.ipv6.conf.all.forwarding=1

Make this permanent by editing /etc/sysctl.conf.

Install WireGuard using its PPA via:

add-apt-repository ppa:wireguard/wireguard
apt-get update
apt-get install wireguard

WireGuard uses DKMS to build the module for the kernel you are running. It would be useful to do a dist-upgrade and reboot before installing this to put yourself on the latest kernel.

The installation of WireGuard above will install and build the kernel module, install the tools and create the /etc/wireguard directory. Let’s go there now and create keys for the server:

cd /etc/wireguard
# create a private server key:
wg genkey >server-private.key
chmod go-rwx server-private.key
# and create a public key from the private key:
cat server-private.key | wg pubkey >server-public.key

We may as well get ahead of ourselves and generate a key pair for our iOS client now also. When we’ve generated the configuration for the server and client, we can delete these key files from the server. In fact you should do this.

wg genkey >client1-private.key
cat client1-private.key | wg pubkey >client1-public.key

Now let’s create the server side configuration in /etc/wireguard/wg0.conf:

[Interface]
Address = 10.97.98.1/24, fd80:10:97:98::1/64
SaveConfig = false
DNS = 8.8.8.8, 2a00:1450:400b:c01::8b
ListenPort = 51820
PrivateKey = <contents of server-private.key>

# client1
[Peer]
PublicKey = <contents of client1-public.key>
AllowedIPs = 10.97.98.2/32, fd80:10:97:98::2/64

Again, chmod go-rwx wg0.conf.

The IPv6 addresses chosen above are unique local addresses (rfc4193) – similar to RFC1918 private addresses in IPv4. When choosing your IPv6 ULA, use a prefix generator such as this one. As we are using ULA addresses, we have to NAT IPv6. I hate doing this but it makes the example simple. If you have routable IPv6 addresses, try and use a real prefix without NAT.

You can now bring the tunnel up and down using the useful utility commands: wg-quick up wg0 and wg-quick down wg0. But you’ll probably want to enable them on systemd for auto-start on system boot:

systemctl enable wg-quick@wg0
systemctl start wg-quick@wg0

When up and running, you can examine the interface with ifconfig wg0 and see the state of clients with just wg:

# ifconfig wg0
wg0: flags=209<UP,POINTOPOINT,RUNNING,NOARP>  mtu 1420
        inet 10.97.98.1  netmask 255.255.255.0  destination 10.97.98.1
        inet6 fd80:10:97:98::1  prefixlen 64  scopeid 0x0<global>
        unspec 00-00-00-00-00-00-00-00-00-00-00-00-00-00-00-00  txqueuelen 1000  (UNSPEC)
        RX packets 0  bytes 0 (0.0 B)
        RX errors 0  dropped 0  overruns 0  frame 0
        TX packets 0  bytes 0 (0.0 B)
        TX errors 0  dropped 0 overruns 0  carrier 0  collisions 0
# wg
interface: wg0
  public key: w29jZeurXAcABTTvA0V5pIOgK8jUZuYxNE9dCciN7Q8=
  private key: (hidden)
  listening port: 51821

peer: WrZzlF0fjMWKFqn/krqPrdyfYnlshLMwDNNiweEocRE=
  allowed ips: 10.97.98.2/32, fd80:10:97:98::2/128

WireGuard has an iOS client – download it from the AppStore here. One of its most useful features is the ability to add a configuration via a QR code (you will need to apt install qrencode on your server). Let’s create a client configuration in a text file on the server now:

[Interface]
PrivateKey = <contents of client1-private.key>
Address = 10.97.98.2/24, fd80:10:97:98::2/64
DNS = 8.8.8.8, 2a00:1450:400b:c01::8b

[Peer]
PublicKey = <contents of server-public.key>
Endpoint = <server-ip/hostname>:51820
AllowedIPs = 0.0.0.0/0, ::/0

Then generate the qrcode and display to screen with: qrencode -t ansiutf8 <client.conf. You’ll be able to import it by pointing your phone at the screen. Sample QR code:

There’s still a couple things you need to do to make this all work: allow UDP packets in your firewall and allow the forwarding and NATing of tunnelled traffic between the tunnel interface and the public internet facing interface(s). I don’t like to over-prescribe how to do this as there are different ways and different topologies. But let me give a basic example.

Start with allowing WireGuard traffic in your firewall – you need an iptables rules such as:

iptables  -A INPUT -p udp --dport 51820 -j ACCEPT
ip6tables -A INPUT -p udp --dport 51820 -j ACCEPT

For forwarding traffic, there are a number of options but the easiest is to use stateful rules to allow established / related traffic and assume everything coming in your encrypted tunnelled WireGuard interfaces is okay:

iptables -A FORWARD -m state --state ESTABLISHED,RELATED -j ACCEPT
iptables -A FORWARD -i wg+ -j ACCEPT

ip6tables -A FORWARD -m state --state ESTABLISHED,RELATED -j ACCEPT
ip6tables -A FORWARD -i wg+ -j ACCEPT

Lastly, for NAT – and assuming eth0 is your public interface, use:

iptables  -t nat -A POSTROUTING -o eth+ -s 10.97.98.0/24 -j MASQUERADE
ip6tables -t nat -A POSTROUTING -o eth+ -s fd80:10:97:98::/64 -j MASQUERADE

Finally, test your set-up works for IPv4 and IPv6 using sites such as ipv6-test.com or ipleak.net.

You can add more peers by editing /etc/wireguard/wg0.conf and then restarting the tunnel interface via systemctl restart wg-guard@wg0. This will briefly disrupt existing tunnel traffic but it’s the simplest method. There are ways to add new tunnels on the command line but you need to remember to keep the configuration file in sync.

Linux (Ubuntu 16.04), PHP and MS SQL

In the many years I’ve been using the traditional LAMP stack, I’ve successfully managed to avoid having anything to do with MS SQL server. Until 2016. This year I’ve had to work quiet a bit with it – administration, backups and, now, scripted queries from Linux with PHP.

I suspect I’m (a) lucky I haven’t had to do this before now; and (b) that Azure seems to have pushed Microsoft into greater Linux based support for MS SQL. The evidence? This open source Mircosoft repository with a MS SQL PHP binary driver for Linux released just a few months ago.

NB: installing the Microsoft PHP driver is different to installing the Microsoft ODBC driver for SQL Server on Linux. These may even be incompatible.

For me, I just took a standard Ubuntu 16.04 install (64bit obviously) with PHP 7.0 and downloaded the latest MS PHP SQL extension (for me, at time of writing, this was 4.0.6. When you untar the Ubuntu16.tar file, copy the .so files to /usr/lib/php/20151012/ and then create a /etc/php/7.0/mods-available/msphpsql.ini file with contents:

extension=php_pdo_sqlsrv_7_nts.so
extension=php_sqlsrv_7_nts.so

Note that the tar also contains two ‘ts’ versions of these files. Trying to use those resulted in errors. Link this for Apache2 / CLI as required. E.g. for PHP CLI:

cd /etc/php/7.0/cli/conf.d/
ln -s ../../mods-available/msphpsql.ini 20-msphpsql.ini

You can confirm it’s working via:

$ php -i | grep sqlsrv
Registered PHP Streams => https, ftps, compress.zlib, php, file, glob, data, http, ftp, sqlsrv, phar
PDO drivers => sqlsrv
pdo_sqlsrv
pdo_sqlsrv support => enabled
pdo_sqlsrv.client_buffer_max_kb_size => 10240 => 10240
pdo_sqlsrv.log_severity => 0 => 0
sqlsrv
sqlsrv support => enabled
sqlsrv.ClientBufferMaxKBSize => 10240 => 10240
sqlsrv.LogSeverity => 0 => 0
sqlsrv.LogSubsystems => 0 => 0
sqlsrv.WarningsReturnAsErrors => On => On

And, finally, for using it, following the the sample scripts from the repository worked a charm.

Debugging NFS Slowness

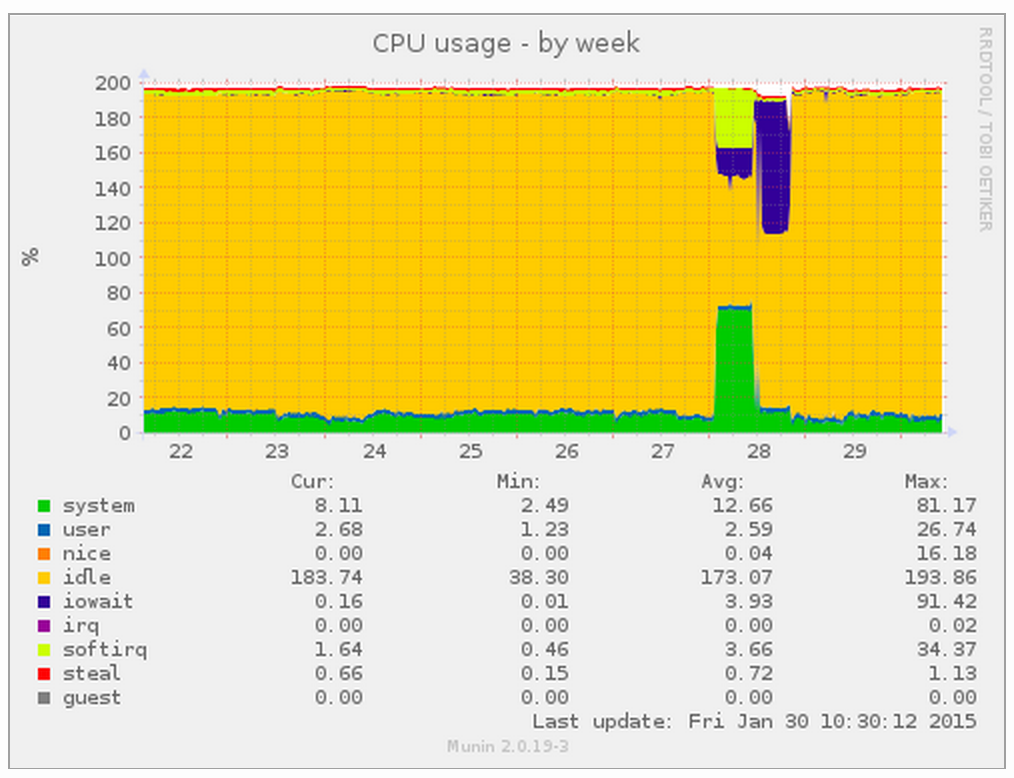
During patching for the recent GHOST bug, I updated all packages (including kernel) on a Ubuntu 14.04 file server (filer). This filer provided static content (mainly tens of thousands of images) to a number of web servers. You can see the effect in the following load graph from the filer:

Load average on the filer

You may notice from the above, that there were actually two issues. The first was solved by upgrading the filer from 14.04 to 14.10 based on a number of online references to symptoms and fixes. About an hour after this upgrade, a new form of NFS slowness manifested and, needless to say, sites that rendered in <1sec were now taking >15secs.

Diagnosing the second issue took a while longer but some tips and utilities include:

  • check /var/log and see if any log files are increasing rapidly;
  • check top and check any processes with high / unusual utilisation;
  • use iostat (apt-get install sysstat) and pay particular attention to any devices with high volumes of transactions per second. In my case it was the root filesystem rather than any of the mounted partitions exported by NFS.
  • use iotop (apt-get install iotop) and note any processes with high utilisation (in my case jbd2/xvda1-8 was at 100% and xvda1-8 is my root partition)

The jbd2 process is the ext4 journaling process. At this point you can evaluate fsck’ing your partition but I wanted to see if I could discover what was happening here. I enabled some debugging via:

# enable tracing:
echo 1 > /sys/kernel/debug/tracing/events/ext4/ext4_sync_file_enter/enable
# wait a couple of seconds and:
cat /sys/kernel/debug/tracing/trace
# and disable tracing:
echo 0 > /sys/kernel/debug/tracing/events/ext4/ext4_sync_file_enter/enable

What I found were lots of:

nfsd-2085  [001] .... 53730942.155573: ext4_sync_file_enter: dev 202,1 ino 276278 parent 149955 datasync 0
nfsd-2071  [001] .... 53730942.158743: ext4_sync_file_enter: dev 202,1 ino 276278 parent 149955 datasync 0
...

where every entry related to the same inode number (276278). We found this via:

find / -inum 276278
/var/lib/nfs/v4recovery

The solution was to stop nfs_kernal_server, remove that directory entirely, add it back and restart the nfs_kernel_server. We got the permissions wrong on the first attempt but this’ll be obvious from dmesg / kernel log messages such as:

kernel: [53731827.778104] NFSD: Failed to remove expired client state directory 8d97cccceb37641d3804a84683a9282a
kernel: [53731827.779204] NFSD: failed to write recovery record (err -13); please check that /var/lib/nfs/v4recovery exists and is writeableNFSD: Failed to remove expired client state directory 8d97cccceb37641d3804a84683a9282a

Development Contracts

At Open Solutions, we tend to undertake a lot of fixed price contracts to develop web applications. In fact, clients usually insist on fixed price contracts as they want to know in advance what the bill will be.

However, fixed price contracts have big negatives for both parties:

  • for the client, a fixed price contract can often limit them to their earliest ideas. Now, as a service provider, we want to be flexible and so we’re happy to chop and change as a project develops. But, this leads to:
  • for the service provider, if change and revision requests are not carefully managed agreed and billed for, the service provider could very quickly end up making a loss on the contract and thus find themselves in the position of funding their clients project!

To this end, we’ve recently been reviewing various web development contracts and have found some nice inspiration for basing our own on.

Following the success of Killer Contract, Andy wrote a plain language NDA (also available as a Gist).

Virtual Mail with Ubuntu, Postfix, Dovecot and ViMbAdmin

As part of pushing our new release of ViMbAdmin, I wrote up a mini how-to for setting up a virtual email system on Ubuntu where the components are:

  • Postfix as the SMTP engine;
  • Dovecot for IMAP. POP3, Sieve and LMTP;
  • ViMbAdmin as the domain / mailbox / alias management system via web interface.

It supports a number of features including mailbox archival and deletion, quota support and display of mailbox sizes (as well as per domain totals).

Find the how-to at:

Querying Cisco MST Port Roles via SNMP with OSS_SNMP

OSS_SNMP is a PHP SNMP library written by myself for people who hate SNMP. After a customer migration from PVST to MST (Multiple Spanning Tree), I have added a number of MST functions / MIBs to OSS_SNMP:

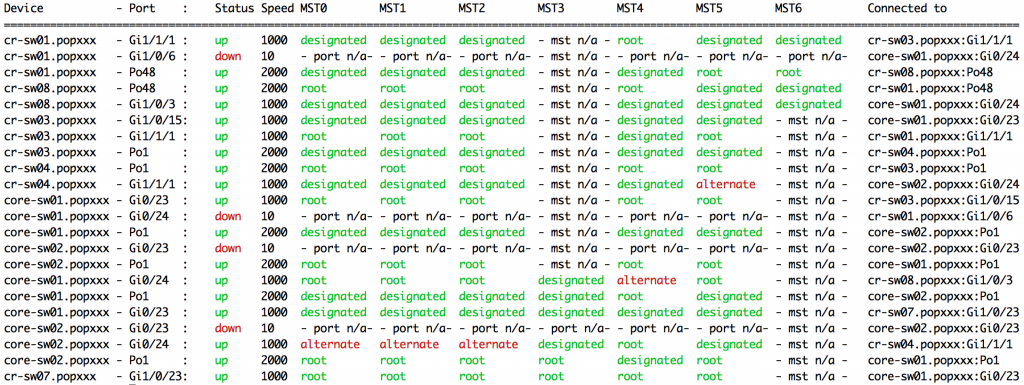
During a fairly significant network migration involving breaking / connecting a number of links, I wanted to be able to monitor the MST port role of significant ports at a glance. For this purpose, I wrote the mst-port-roles.php script and have committed it as an example to OSS_SNMP. First, here is what it looks like when run on the command line (with hostnames obfuscated):

MST Port RolesFrom a very simple array of port details at the top of the script, it will poll all switches and for each port print:

  • device and port name;
  • port state and speed;
  • port role for each applicable MST instance.

I run it on bash and use bash colouring. The script is well documented and can easily be repurposed for other networks. You’ll find the source here.

Bird / Quagga with MD5 Support for IPv4/6 on FreeBSD & Linux

Over in INEX we run a route server cluster which alleviates the burden of setting up bilateral peering sessions for the more than 80% of the members that use them. The current hardware is now about six years old and we have a forklift upgrade in the works.

BGP allows for MD5 authentication between clients (using the TCP MD5 signature option, see RFC 2385) and – while recently obsoleted in RFC 5925 – it is still widely used in shared LAN mediums such as IXPs; primarily to prevent packet spoofing and session hijacking via recycled IP addresses.

Our current route server implementation runs on FreeBSD which does not support TCP MD5 in its stock kernel (you are required to compile a custom kernel – see below for details). Additionally, specifying the session MD5 is not done in the BGP daemon configuration but separately in the IPsec configuration. Lastly, our current FreeBSD version has no support for TCP MD5  over IPv6. These have all led to unnecessarily complex configurations and a degree of confusion.

Because of this, we decided to test up to date Linux and FreeBSD versions for native IPv4 and IPv6 TCP MD5 support with Bird and Quagga (our route server daemons of choice).

In each case, BGP sessions were tested for:

  • no MD5 on each end (expected to work);
  • same MD5 on each end (expected to work);
  • different MD5 on each end (expected not to work); and
  • MD5 on one end with no MD5 on the other end (expected not to work).

For Linux, the platform chosen was Ubuntu 12.04 LTS with the stock 3.2.0-40-generic kernel.

  • Sessions were tested for Quagga to Quagga and Quagga to Bird;
  • Sessions were tested over both IPv4 and IPv6;
  • The presence of valid MD5 signatures were confirmed using tcpdump -M xxx;
  • Stock Quagga and Bird from the 12.04 apt repositories were used.

The results - everything worked and worked as expected:

  • BGP sessions only established when expected (no MD5 configured, same MD5 configured);
  • This held for both IPv4 and IPv6.

Summary: Linux will support TCP MD5 nativily for IPv4 and IPv6 when using Quagga or Bird.

For FreeBSD, we used the latest production release of 9.1. TCP MD5 support is not compiled in by default so a custom kernel must be built with the additional options of:

options   TCP_SIGNATURE
options   IPSEC
device    crypto
device    cryptodev

In addition to this, the MD5 shared secrets need to be added to the IPsec SA/SD database via the setkey utility or, preferably, via the /etc/ipsec.conf file which, for example, would contain entries for IPv4 and IPv6 addresses such as:

add 192.0.2.1 192.0.2.2 tcp 0x1000 -A tcp-md5 "supersecret1";
add 2001:db8::1 2001:db8::2 tcp 0x1000 -A tcp-md5 "supersecret2";

where the addresses ending in .1/:1 are local and .2/:2 are the BGP neighbor addresses. This file can be processed by setting ipsec_enable="YES" in /etc/rc.conf and executing /etc/rc.d/ipsec reload.

  • Sessions were tested for Quagga/Linux to Quagga/FreeBSD and  from Quagga/Linux to Bird/FreeBSD;
  • Sessions were tested over both IPv4 and IPv6;
  • The presence of valid MD5 signatures were confirmed using tcpdump -M xxx;
  • Stock Quagga from the 12.04 apt repositories and stock Quagga and Bird from FreeBSD ports were used.

The results – almost everything worked and worked as expected:

  • BGP sessions only established when expected (no MD5 configured, same MD5 configured);
  • This held for both IPv4 and IPv6;
  • one odd but expected behavior – you only need to set the MD5 via setkey / ipsec.conf – setting it (or not) in the Quagga and Bird config has no effect so long as it is set via setkey (but is useful for documentation purposes). However, trying to set it in Quagga without having rebuilt the kernel will result in an error.

Summary: FreeBSD will support TCP MD5 via a custom kernel and setkey / ipsec.conf for IPv4 and IPv6. Note that there is an additional complexity when changing or removing MD5 passwords as these need to be amended / deleted via setkey which can put an extra burden on automatic route server configuration generators.

Translating SNMP OIDs Using MIB Files

I get caught trying to remember this a lot and there’s a really useful tutorial on this at the Net-SNMP website: Using and loading MIBS.

If you’re using Ubuntu, also consider checking the comments in /etc/snmp/snmp.conf which (in 13.04) contains:

As the snmp packages come without MIB files due to license reasons, loading of MIBs is disabled by default. If you added the MIBs you can reenable loading them by commenting out the following line.

Also, run the following:

apt-get install snmp-mibs-downloader

which will download some basic MIBs as part of the installation.