Encoding Full HD as FLV (for Gallery3)

I have a full HD camcorder and I wanted to stick some good quality video on my gallery for relatives to view. So, I needed to convert my sample 100MB MP4 full HD file to a suitably sized FLV for the Gallery. Here’s what I did…

I have a very nice Samsung R10 Full HD Camcorder which I bought last year. After a recent family holiday, I wanted to stick some good quality video on my gallery for relatives to view. The gallery is RC2 of the excellent Gallery 3 package which uses another excellent open source tool called Flow Player to play movies.

So, I needed to convert my test 100MB MP4 full HD file to a suitably sized FLV for the Gallery. My initial attempts with ffmpeg worked fine but the quality (sample) was very poor and changing the bit rate in different ways seemed to make no difference:

ffmpeg -i HDV_0056.MP4 -vb 600k -s vga -ar 22050 -y Test.flv
ffmpeg -i HDV_0056.MP4 -b 600k -s vga -ar 22050 -y Test.flv
ffmpeg -i HDV_0056.MP4 -vb 600k -s vga -ar 22050 -y Test.flv

I then turned to x264 and broke the process down to a number of stages:

  1. Extract the raw video to YUV4MPEG (this creates a 7GB file from my 100MB MP4):
    ffmpeg -i HDV_0056.MP4 HDV_0056.y4m
  2. Encode the video component to H.264/FLV at the specified bit rate with good quality:
    x264 --pass 1 --preset veryslow --threads 0 --bitrate 4000 \
            -o HDV_0056.flv HDV_0056.y4m
    x264 --pass 2 --preset veryslow --threads 0 --bitrate 4000 \
            -o HDV_0056.flv HDV_0056.y4m

    Note that I’m using the veryslow preset which is… very slow! You can use other presets as explained in the x264 man page.

  3. Extract and convert the audio component to MP3 (the sample rate is important):
    ffmpeg -i HDV_0056.MP4 -vn -ar 22050 HDV_0056.mp3
  4. Merge the converted audio and video back together:
    ffmpeg -i HDV_0056.flv -i HDV_0056.mp3 -acodec copy \
            -vcodec copy -y FullSizeVideo.flv

    This yields a near perfect encoding at 22MB. It’s still full size though (HD at 1920×1080).

  5. The last step is to then use ffmpeg to resize the video and it now seems to respect bit rate parameters:
    ffmpeg -i FullSizeVideo.flv -s vga -b 2000k \
            -vb 2000k SmallSizeVideo.flv

The resultant video can be seen here.

Robert Swain has a useful guide for ffmpeg x264 encoding.

Emily @ Glenroe Open Farm

image

image

image

From their own site:

Glenroe Farm is one of Wicklow’s top tourist attractions. The farm is ideally located beside the picturesque North Wicklow coastline and less than an hour from Dublin City just off the N11.The farm is both educational and fun and here you can get up close to a wide variety of farm animals and pets, enjoy the great outdoors, relax in the peace and tranquillity of our Nature walk, have fun in the large outdoor playground overlooking the farm, try our home cooking from the Coffee Shop or bring your own picnic.

Installing FreeBSD on Soekris net4801-48

Nick introduced me to Soekris a few weeks ago and some neat little boxes they make. For a current project, the net4801 fit the bill perfectly, especially with the add in vpn1411 which off loads the intensive computational operations for encryption and compression.

I plan some future posts looking at the throughput performance of OpenVPN with and without the vpn1411 as well as general traffic throughput measurements. This post however will focus on installing FreeBSD on this device as easily as possible.

Firstly, I ordered the following:

Including P&P, this all came to €369.48.

While there is a lot of documentation online and a number of methods available to install FreeBSD on a Soekris box, I found that the easiest way to to do it was as if I were installing on the local machine and hence I could just install it as normal. For this, we turn to VirtualBox1.

  1. Install VirtualBox if you don’t have it.
  2. Attach the CF card to your computer via the USB card reader.
  3. Download a FreeBSD installation CD (e.g. 8.0-RELEASE-i386-disc1.iso.
  4. Create a new VirtualBox machine such that:
    • the ISO image is mounted;
    • you have enabled a network adapter (PCnet-PCI II in bridged mode works for me as I have a DHCP server on the LAN).
  5. Boot the new VirtualBox machine and from its built in BIOS, choose to boot from the mounted CD ROM.
  6. Immediately attach the USB card reader device to the VirtualBox machine.
  7. Choose a custom install so you can select the USB device as the destination medium (da0 for me).
  8. Proceed with your FreeBSD installation as normal.

Once it completes, there are some changes you should make before popping the CF card back into the Soekris box:

  1. In /etc/rc.conf, set up the network configuration. Note that in VirtualBox, the interfaces will be reported as le0 but when booted on the Soekris box, they’ll be sis0 through sis2. I set sis0 (marked Eth 0 on the case) to configure by DHCP. I also set a static IP on sis2 so I can access the box on a direct computer to computer connection if necessary. Lastly, I enable the SSH daemon (ensure you have created a user!):
    ifconfig_sis0="DHCP"
    ifconfig_sis2="inet 192.168.130.2 netmask 255.255.255.0 up"
    sshd_enable="YES"
    
  2. When installing via VirtualBox, the destination device was a USB drive. On the Soekris, the CF is handled as an IDE drive. As such, change fstab to something like (as appropriate for you – I have a single root filesystem and a swap partition):
    # Device                Mountpoint      FStype  Options         Dump    Pass#
    /dev/ad0s1b             none            swap    sw              0       0
    /dev/ad0s1a             /               ufs     rw              1       1
    
  3. Enable a console on the serial port in /etc/ttys by editing the ttyu0 line:
    ttyu0   "/usr/libexec/getty std.9600"   vt100   on secure                          
    
  4. Lastly, add the following lines to /boot/loader.conf:
    comconsole_speed="9600"
    console="comconsole"
    

Now, pop the CF card back into the Soekris box and boot with the serial console attached (19200,8,n,1). I immediately changed the Soekris console speed to 9600 so that it works seemlessly from Soekris BIOS to FreeBSD bootloader, kernel and console.

1. VirtualBox is a fantastic piece of software. I run Kubuntu natively on my laptop and I have a virtual Windows 7 Professional machine running in VirtualBox most of the time. It runs smoothly and quickly and there is a wonderful feature to allow you to attach USB devices to the virtual machine (so my iPhone can access iTunes for example).

perl: warning: Falling back to the standard locale (“C”)

Every time I debootstrap a new Debian server for a XenU domain, I get lots of verbose output from Perl scripts:

perl: warning: Setting locale failed.                                      
perl: warning: Please check that your locale settings:                     
        LANGUAGE = (unset),                                                
        LC_ALL = (unset),                                                  
        LANG = "en_IE.UTF-8"                                               
    are supported and installed on your system.                            
perl: warning: Falling back to the standard locale ("C").    

The fix is simple:

# apt-get install locales
# dpkg-reconfigure locales

and select your locales.

Kubuntu 8.10 and Mobile Broadband (and KDE 4.1)

Kubuntu 8.10 and mobile broadband – the KNetworkManager has come a long way!

I updated my laptop from Kubuntu 8.04 to 8.10 (just released) yesterday. I do 90% of my work on my desktop which needs to just work and, as such, it’s running Kubuntu 7.10. My laptop, however, I play around with.

Most people’s first impression of 8.10 will be based on the upgrade process and post install issues. To date, I’ve always had to fix a lot of problems with the system after an upgrade to make it work. Not this time – it was absolutely seamless.

I was also apprehensive about KDE 4.1 and, to be honest, I was really worried that in a crunch I’d have to fall back to Gnome before degrading back to 8.04. I just don’t have the time these days to follow KDE development as much as I used to and I briefly installed KDE 4 a few months ago and thought it was far from finished.

I’m delighted to report KDE 4.1 is very slick and very polished. I’ve only had it for just over 24 but I have no complaints yet.

However, my main motivation for the upgrade was mobile broadband. Like most people, I use my laptop when on the move and my desktop when in the office. My laptop has an Ethernet port and a wi-fi card which both worked great with KNetworkManager but not mobile broadband. I got O2’s broadband dongle (the small USB stick) about four months ago and rely on it heavily.

I’ve been using Vodafone’s Mobile Connect Client to great effect but there were some issues:

  • setting up the connection was a manual process (change X window access control; su to root; export the DISPLAY setting; and start the application);
  • if I suspended the laptop then I needed to reboot the system to use the dongle again.

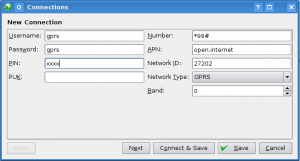
While both of the above could be solved, it’s just not plug and play. 8.10 is. With the dongle plugged into the USB port, KNetworkManager discovered the tty port. Configuring it was as easy as right clicking on the KNetworkManager icon and selecting New Connection… icon for the tty port.

The next step requires knowledge of the O2 / provider settings but this is readily available online. For O2:

KNetworkManager - Settings for O2 Ireland

After the above, I just accepted the defaults for the rest of the options. And – to my delight – it just worked. And it worked after suspended the laptop. And after popping the USB dongle in and out for the heck of it. By clicking the Auto Connect option as part of the process, it also just works when I pop the dongle in.

chan_ss7, pcap files and 64bit machines

UPDATE: April 29th 2008

Anders Baekgaard of Dicea ApS (current chan_ss7 maintainers) recommends the following alternative patch. Please note that mtp3d.c will also need to be patched in the same way:

--- chan_ss7.c~ 2008-04-03 09:23:56.000000000 +0200
+++ chan_ss7.c  2008-04-29 08:29:20.000000000 +0200
@@ -249,11 +249,12 @@

 static void dump_pcap(FILE *f, struct mtp_event *event)
 {
+  unsigned int sec  = event->dump.stamp.tv_sec;
   unsigned int usec  = event->dump.stamp.tv_usec - 
     (event->dump.stamp.tv_usec % 1000) +
     event->dump.slinkno*2 + /* encode link number in usecs */
     event->dump.out /* encode direction in/out */;

-  fwrite(&event->dump.stamp.tv_sec, sizeof(event->dump.stamp.tv_sec), 1, f);
+  fwrite(&sec, sizeof(sec), 1, f);
   fwrite(&usec, sizeof(usec), 1, f);
   fwrite(&event->len, sizeof(event->len), 1, f); /* number of bytes of packet in file */
   fwrite(&event->len, sizeof(event->len), 1, f); /* actual length of packet */

END UPDATE: April 29th 2008

A quickie for the Google trolls:

While trying to debug some SS7 Nature of Address (NAI) indication issues, I needed to use chan_ss7’s ‘dump’ feature from the Asterisk CLI. It worked fine but the resultant pcap files always failed with messages like:

# tshark -r /tmp/now
tshark: "/tmp/now" appears to be damaged or corrupt.
(pcap: File has 409000-byte packet, bigger than maximum of 65535)

After much digging about and head-against-wall banging, I discovered the issue
is with the packet header in the pcap file. It’s defined by its spec to be:

typedef struct pcaprec_hdr_s {
        guint32 ts_sec;         /* timestamp seconds */
        guint32 ts_usec;        /* timestamp microseconds */
        guint32 incl_len;       /* number of octets of packet saved in file */
        guint32 orig_len;       /* actual length of packet */
} pcaprec_hdr_t;

chan_ss7 uses the timeval struct defined by system headers to represent ts_sec and ts_usec. But, on 64bit machines (certainly mine), these values are defined as unsigned long rather than unsigned int (presumably as a step to get over the ‘year 2038 bug’). Hence the packet header is all wrong.

An easy solution is the following patch in mtp.h:

77a78,90
> /*
>  * The packet header in the pcap file (used for the CLI command 'dump') is 
defined so has to
>  * have the two time components as unsigned ints. However, on 64bit 
machines, the system
>  * timeval struct may use unsigned long. As such, we use a custom version 
here:
>  */
> struct _32bit_timeval
> {
>   unsigned int tv_sec;            /* Seconds.  */
>   unsigned int tv_usec;      /* Microseconds.  */
> };
>
>
>
125c138
<       struct timeval stamp;        /* Timestamp */
---
>       struct _32bit_timeval stamp;        /* Timestamp */

There may be a better way – but this works.

This relates to chan_ss7-1.0.0 from http://www.dicea.dk/company/downloads and I have let them know also. It’s also a known issue for the Wireshark developers (although I did not investigate in detail to see what their resolution was for the future). See the following thread from 1999:

Amazon AWS Keeps Getting Better

Amazon’s Web Services have just launched a health dashboard which should prove very useful and can be found at http://status.aws.amazon.com.

They’ve also announced paid support services.

An eagerly awaited feature for me is persistent EC2 storage which they are trialling right now and hopefully I’ll get into the beta program. Fingers crossed!

Stargate SG1 – Finishing the Story


Following up from a discussion on how the series finale disappointed a few people over on Donncha’s blog, Holy Shmoly!, I thought I might point out that a straight-to-DVD movie which actually ends the two-year story arc has just been released.

You can buy a copy (at a great price thanks to the dollar rate) from here on Amazon.

A spoiler-free review and a discussion on the decision to end the series in this manner can be found here on GateWorld. And just to whet you appetite, a trailer follows below.

I’m in yr datacentur…

The last thing I want to do is point and laugh at anyone else’s problems – God knows we’ve all been in the trenches – but this is just too funny a pun and deserves a link:

http://talideon.com/weblog/2008/02/cooling-problems.cfm

Linux on a Dell Vostro 200

Following a recent post to ILUG asking about setting Linux up on a Dell Vostro 200, I followed up with my notes from the time I had to do it a few months back.

This is just a copy of my notes rather than a how-to but any competent Linux user should have no problem. Apologies in advance for the brevity; with luck you’ll be using a later version of Linux which will already have solved the network issue…

The two main issues and fixes were:

  • The SATA CD-ROM was not recognised initially and the fix was set the following parameter in the BIOS:

    BIOS -> Integrated Peripherals -> SATA Mode -> RAID

  • The network card is not recognised during a Linux install. Allow install to complete without network and then download Intel’s e1000 driver from http://downloadcenter.intel.com/ or specifically by clicking here. The one I used then was e1000-7.6.9.tar.gz but the current version appears to be e1000-7.6.15.tar.gz (where the above link heads to – check for later versions).

    My only notes of the install just say “essentially follow instructions in README” so I assume they were good enough! Obviously you’ll need Linux kernel headers at least as well as gcc and related tools.

    Once built and installed, a:

    modprobe e1000

    should have you working. Use dmesg to confirm.